

Summer Solar Installation Guide

Summer Solar Installation Guide
Summer is the best time to go solar — longer days mean more sun hours, faster ROI, and more time to enjoy energy independence before winter. Whether you're planning a full off-grid system or adding battery backup to your home, this guide walks you through every step.
☀️ Why Summer Is the Best Time to Install Solar
- Peak sun hours: Summer delivers the highest solar irradiance of the year across the US, meaning your panels produce more power per day.
- Faster payback: Higher production in summer months accelerates your return on investment.
- Beat the fall rush: Installers and equipment ship faster when you order early in the season.
- Incentives are live: Federal and state tax credits, rebates, and net metering programs are fully active — don't leave money on the table.
📐 Step 1: Size Your System
Getting the right system size is the most important step. Too small and you won't cover your energy needs; too large and you're overspending. Use our free calculators to nail your sizing:
- 🔧 Solar Kit Finder & Sizing Tool — Answer a few questions and get a personalized kit recommendation.
- 📐 Solar Panel Tilt Angle Calculator — Optimize your panel angle for maximum summer output.
- ⚡ Solar Panel Charge Time Calculator — Estimate how long it takes to charge your battery bank.
- 🔌 Series & Parallel Wiring Calculator — Plan your panel array configuration.
- 🔋 Maximum Voltage Calculator — Ensure your array voltage stays within safe limits.
- 💡 Electricity Cost / kWh Calculator — Calculate your current energy costs to measure savings.
🔆 Step 2: Choose Your Solar Panels
The right panels depend on your roof space, budget, and efficiency goals. We carry a wide range of options:
- All Solar Panels — Browse our full panel lineup.
- Monocrystalline Solar Panels — Highest efficiency, ideal for limited roof space.
- Bifacial Solar Panels — Capture light from both sides for up to 30% more output.
- Flexible Solar Panels — Perfect for curved surfaces, RVs, and boats.
- Portable Solar Panels — Great for camping, overlanding, and emergency backup.
🔄 Step 3: Select the Right Inverter
Your inverter converts DC power from your panels into usable AC power for your home or appliances. Choosing the right type matters:
- Hybrid Inverters — Best for grid-tied systems with battery backup. Manages solar, grid, and battery simultaneously.
- Off-Grid Inverters — Designed for fully independent systems with no grid connection.
Shop our inverter collections:
Use our kVA to Amps Calculator and kW to kVA Calculator to match your inverter to your load requirements.
🔋 Step 4: Add Battery Storage
Battery storage lets you use solar power after sunset, during outages, and on cloudy days. Summer is the ideal time to install batteries — you'll charge them fast and have full backup capacity heading into fall and winter.
- SOK Batteries — Reliable LiFePO4 batteries with excellent cycle life.
- Pytes Batteries — High-capacity rack-mount batteries for larger systems.
- Battery Chargers — Keep your batteries topped up from grid or generator.
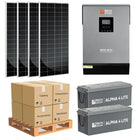
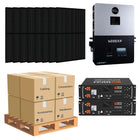
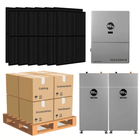
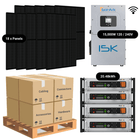
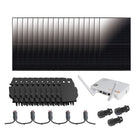
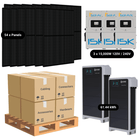
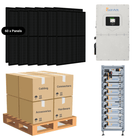
📦 Step 5: Shop Complete Solar Kits
Not sure where to start? Our complete kits include everything you need — panels, inverter, batteries, wiring, and mounting hardware — pre-matched and ready to install:
-
Complete Solar Panel Kits — Our most popular all-in-one solutions.
- Solar Generator Kits — Portable power for any situation.
- Emergency Solar Power Kits — Be ready for outages and disasters.
- Best Selling Solar Generator Kits — Our customer favorites.
- 1500 Watt Solar Kits — A popular size for cabins, RVs, and small homes.
🏛️ Step 6: Understand Permitting & Incentives
Most residential solar installations require a permit from your local authority having jurisdiction (AHJ). Here's what to know:
- Federal Investment Tax Credit (ITC): Claim 30% of your total system cost as a federal tax credit. This applies to equipment and installation.
- State & utility rebates: Many states offer additional incentives on top of the federal credit. Check your state's energy office website for current programs.
- Net metering: If you're grid-tied, excess power you generate can be sold back to your utility — check your utility's net metering policy.
- Permitting timeline: Plan for 2–6 weeks for permit approval depending on your municipality. Apply early in the summer to avoid delays.
Pro tip: Our team can help you understand what documentation you'll need. Contact us and we'll point you in the right direction.
💰 Step 7: Explore Financing Options
Going solar doesn't have to be an all-cash purchase. Common financing options include:
- Solar loans: Finance your system over 5–20 years, often with rates lower than a home equity loan.
- PACE financing: Property Assessed Clean Energy programs let you repay through your property tax bill.
- Home equity: Use your home's equity to fund your system at favorable interest rates.
- Cash purchase: The fastest payback and highest lifetime savings — especially with the 30% ITC.
🛠️ Summer Installation Tips
- Schedule early: Installers book up fast in summer. Order your equipment now and lock in your install date.
- Check your roof: Inspect for damage or aging shingles before mounting panels — it's much easier to repair before installation.
- Optimize tilt angle: Use our Tilt Angle Calculator to set your panels for peak summer production.
- Plan for shade: Even partial shading can significantly reduce output. Map your roof's sun exposure throughout the day.
- Heat considerations: Solar panels are slightly less efficient at very high temperatures — ensure adequate airflow under your panels.
📞 Need Help? We've Got You.
ShopSolar offers lifetime customer support on every order. Whether you're sizing your first system or expanding an existing one, our team is here to help — before, during, and after your purchase.
- Use the Solar Kit Finder & Sizing Tool to get a personalized recommendation.
- Browse our Learning Center with 600+ articles on solar installation, maintenance, and product comparisons.
- Contact our team — we're solar experts, not just salespeople.